Enabling the Transparent proxy mode in the WAF 2.0 module allows you to see the real IP addresses behind the WAF module instead of the server’s own IP address(es) without setting up the X-Forwarded-For header in your web server.
Instructions
Enable the WAF module
You can enable the module from the Dashboard by clicking on the server cards cogwheel icon or from the Configuration menu as well. You just need to click on the switch icon next to the WAF 2.0 module.
You can enable the module from the Dashboard by clicking on the server cards cogwheel icon or from the Configuration menu as well. You just need to click on the switch icon next to the WAF 2.0 module.

Do you or your customers use any CDN or proxy?
If yes, then please also enable the Trusted Proxy module from the Dashboard. You can find it by clicking on the server cards cogwheel icon or from the Configuration menu.
If yes, then please also enable the Trusted Proxy module from the Dashboard. You can find it by clicking on the server cards cogwheel icon or from the Configuration menu.
We need to set this up in the WAF 2.0 module’s Settings.
- Open the Configuration menu on your BitNinja dashboard.
- Select the setting level on the left side. (server-level, server group-level, account-level)
- Select the WAF 2.0 module on the left side
- Change the “Redirect options” parameter to “Transparent.”
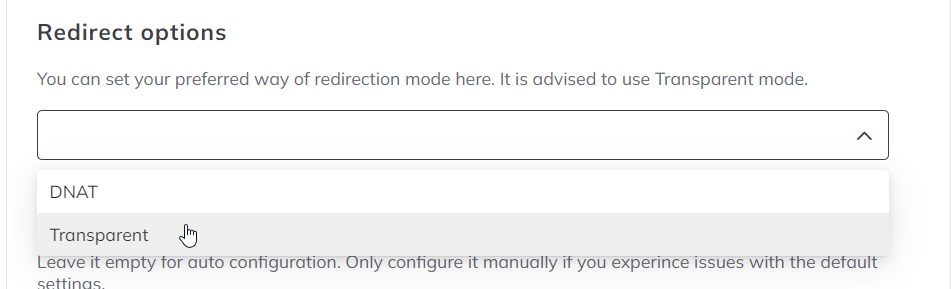
- Click on the Save button at the top of the screen
Litespeed
If you have the integrated brute-force protection module enabled in Litespeed, please make sure to add all IP addresses of your server to the Trusted IP list in Litespeed.
Adding ‘ALL’ is not sufficient; add all IP addresses or IP ranges used by the server to the list.
Please go to the LiteSpeed Configuration menu and select the Server and select General. In the General / Settings menu, you can see Use Client IP in Header. Here select Trusted IP Only. You can add the IP address(es) of your server under the General tab under Security at Access Control at the Allowed list. You need to add your server’s IP addresses separated with space. You can check out the syntax here: https://www.litespeedtech.com/docs/webserver/config/security#accessControl_allow
If you change the Logformat setting under the General tab/ Log tab to look like this:
Then the BitNinja SenseLog module will protect Litespeed from the brute force attacks and Litespeed’s brute force protection can be disabled.
If you have the integrated brute-force protection module enabled in Litespeed, please make sure to add all IP addresses of your server to the Trusted IP list in Litespeed.
Adding ‘ALL’ is not sufficient; add all IP addresses or IP ranges used by the server to the list.
Please go to the LiteSpeed Configuration menu and select the Server and select General. In the General / Settings menu, you can see Use Client IP in Header. Here select Trusted IP Only. You can add the IP address(es) of your server under the General tab under Security at Access Control at the Allowed list. You need to add your server’s IP addresses separated with space. You can check out the syntax here: https://www.litespeedtech.com/docs/webserver/config/security#accessControl_allow
If you change the Logformat setting under the General tab/ Log tab to look like this:
%a %l %u %t \"%r\" %>s %b \"%{Referer}i\" \"%{User-Agent}i\"" combinedThen the BitNinja SenseLog module will protect Litespeed from the brute force attacks and Litespeed’s brute force protection can be disabled.
Let’s check if the WAF module is working properly.
The easiest way to test whether the BitNinja WAF 2.0 module is working okay is, to add
The easiest way to test whether the BitNinja WAF 2.0 module is working okay is, to add
/?test=/etc/passwd after one of the domain’s URL in the browser. The WAF module should stop the request as it is a local file inclusion attempt. It didn’t work for me.
Don’t give up!
Settings
You can access the WAF module’s settings by clicking on the Firewall menu at the top and selecting the Web Application Firewall menu point.
You can access the WAF module’s settings by clicking on the Firewall menu at the top and selecting the Web Application Firewall menu point.
If you experience redirection errors (e.g.: too many redirections) on your domains when BitNinja and Cloudflare are both enabled on the domain, make sure to disable the WAF module of Cloudflare and set the SSL/TLS encryption mode in Cloudflare to Full (Full strict doesn’t work).