First, we need to check what kind of error code you see.
Backend webserver Unreachable
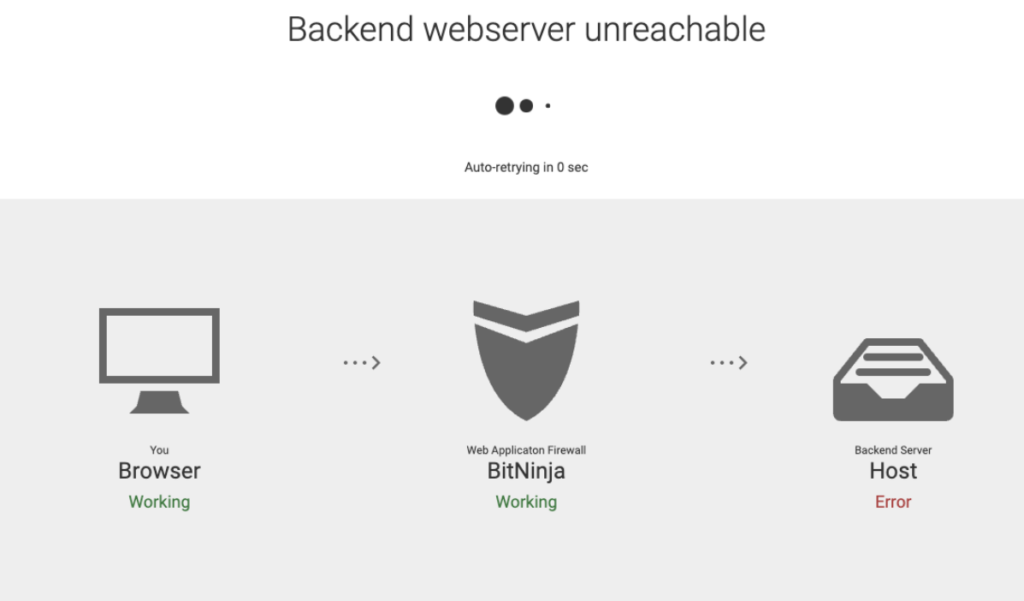
When BitNinja displays a “Backend webserver Unreachable” error, it means the Web Application Firewall (WAF) is unable to connect successfully to your web server. This can be caused by various system, configuration, or compatibility issues.
Below are the most common causes and the recommended solutions.
1. Conflicts with Other Firewalls
BitNinja may experience interference from other security solutions installed on your server.
Known conflicting software:
- Imunify360
- Dome9
- Plesk firewall
Possible solutions:
- Temporarily disable other firewall solutions to verify whether they are causing the conflict.
- Ensure BitNinja’s required ports are open in both directions (inbound and outbound).
Refer to our System Requirements for a complete list of our requirements.
2. TLS 1.3 Compatibility Issue
Due to technical limitations, the NGINX proxy version used in our WAF 2.0 module does not support TLS 1.3.
If you check our nginx version:/opt/bitninja-waf/sbin/nginx -V
You can see that it is built with OpenSSL 1.0.2zg 7 Feb 2023, while TLS 1.3 was introduced in OpenSSL 1.1.1.
Why only some of my users have this issue?
Here’s what’s happening:
TLS (Transport Layer Security) is the protocol used to secure HTTPS connections.
TLS 1.3 is the latest version and offers better performance and security, but not all clients require it.
Your server currently supports multiple encryption versions, including TLS 1.3, while BitNinja WAF 2.0 NGINX only supports TLS 1.2
Some users, most commonly using Safari browsers or IOS operating systems, force TLS 1.3, which makes it unavailable to fall back to TLS 1.2. Because of this, the user ultimately receives the Backend webserver Unreachable error.
Other users use slightly older browsers or more tolerant devices that can fall back to TLS 1.2 without issue, so they can still access the site.
Recommended Action:
- Disable TLS 1.3 in your web server configuration.
- Verify if Cloudflare or any other CDN doesn’t force TLS 1.3
- Use TLS 1.2 instead to maintain compatibility with WAF 2.0.
3. Web Server Rate Limiting
Aggressive rate limiting or timeout settings on your web server may cause BitNinja to fail in establishing a backend connection.
Recommended Action:
- Review the following settings in your web server configuration:
- Timeout durations
- Maximum number of connections
- Rate-limiting rules
- Ensure these values align with what BitNinja expects.
You can view BitNinja’s active timeout and rate-limiting configuration values here:
- Configuration → WAF 2.0
- Configuration → Advanced Modules → Protection on HTTPS
Error 502
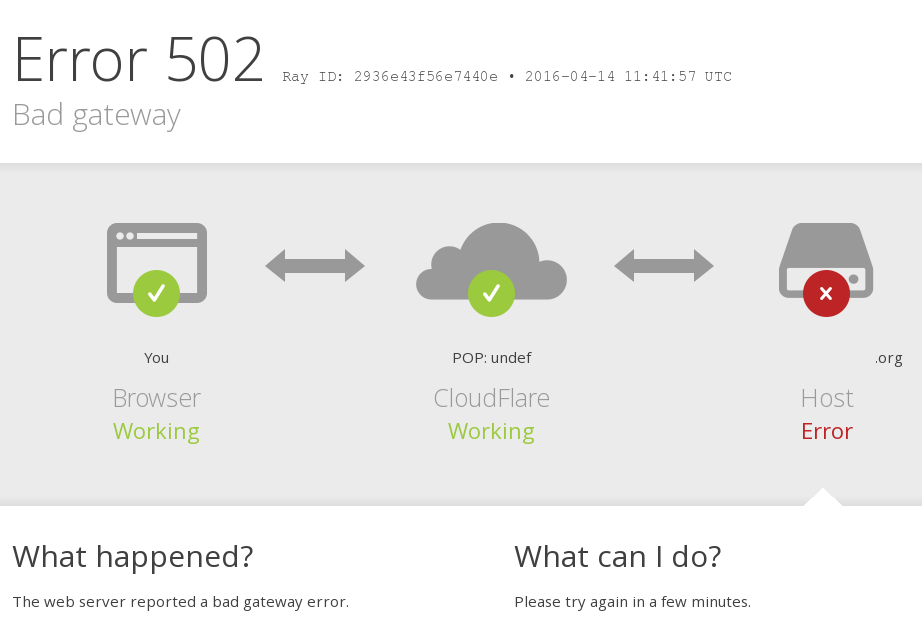
If you see this screen when you try to access a domain that is behind CloudFlare while BitNinja is running with the WAF module enabled and the Trusted proxy module enabled.
- Issue
bitninjacli --module=SslTerminating --regenerate - Wait for a minute to make sure the command went trough
- Run
bitninjacli --module=SslTerminating --reload
Then all domains that are behind Cloudflare should be reachable from now.
504 Gateway Time-out
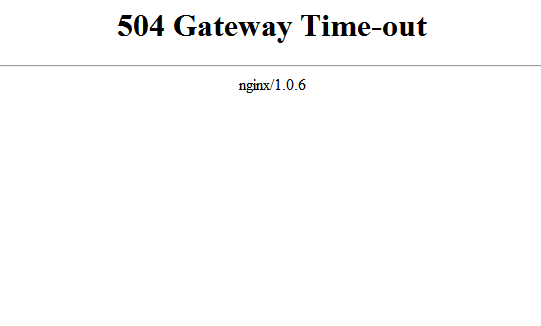
If you see a time-out error 504 from Nginx, like in this screenshot, we need to increase the timeout threshold. We have to increase the values of the “Proxy read timeout” and “HAProxy timeout”.
How to change the value of Proxy read timeout?
- Open the Configuration menu on your BitNinja dashboard.
- Select the setting level on the left side. (server-level, server group-level, account-level)
- Select the WAF 2.0 module on the left side
- Scroll down and select the “Advanced settings” menu at the bottom.
- Change the “Proxy read timeout” value to 300
- Click on the “Apply” button at the top of the screen
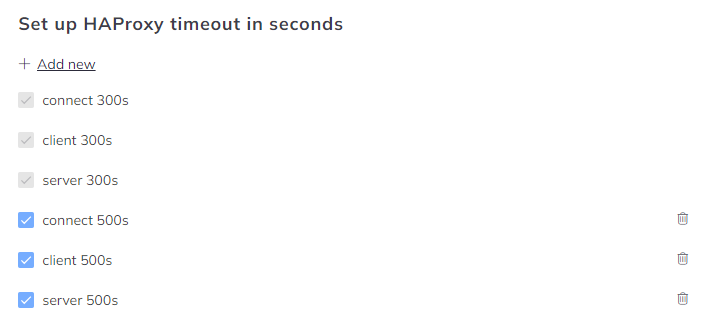
How to change the value of HAProxy timeout?
- Open the Configuration menu on your BitNinja dashboard.
- Select the setting level on the left side. (server-level, server group-level, account-level)
- Select the Advanced module on the left side
- Scroll down and select the “Protection on HTTPS” menu at the bottom.
- Under “Set up HAProxy timeout in seconds” you have to click the “+Add new” button and type in the configuration’s name and the value.
For example: connect 500s then press “Add”
Of course, the values can be higher according to your preference. We suggest adjusting the values of the other configurations, such as client and server, as well. - Don’t forget to click on the “Apply” button at the top of the screen
Once you have configured all the options mentioned earlier, the end result should resemble this:
You can also send us a ticket here.